A reader told me he was having problems with his 3DCLIP command after upgrading to AutoCAD 2013. He wrote:
“I create 3 or 4 different 3d models that I then xref them together into an arrangement drawing. I then create my viewports for the different views I will need. In the past, I would click into my viewport to get it into view model space and then I use 3dclip to adjust clipping planes to get the view looking the way I want it. I have found with Acad 2013 that I can’t do that anymore, when I get to 3dclip only my back clipping plane shows up, for some reason my front clip plane has disappeared – any idea why or how I might fix this?”
I told him I’d never heard ot this problem, so he wrote back.
“Hey Ellen, it’s the color of the clipping plane that is messing me up – with a black clipping plane and black background I can’t see it. If I change my background to white I can see the plane but my 50 yr old eyes can’t handle the white background. Any thoughts on how to change the color of a clipping plane?”
That rang a bell. Here’s what I told him to do:
- Start the OPTIONS command. You can right-click almost anywhere and choose Options.
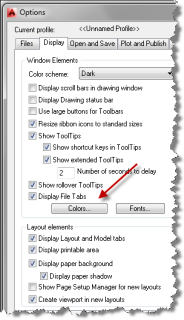
- The Options dialog box opens. Click the Display tab.
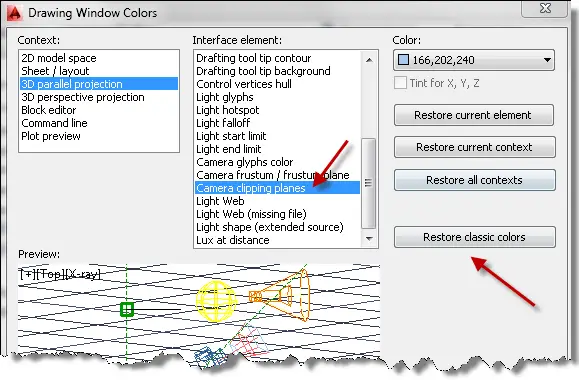
- Click the Colors button to open the Drawing Window Colors dialog box. Here, you can alter the color of almost any interface item in the AutoCAD window — making AutoCAD the most customizable interface I know of. The most common item to change here is the drawing background, but you’ll find a lot more options here.
- In this case, I said to choose 3D Parallel Projection (and repeat with 3D Perspective Projection) in the Context list. Don’t forget to choose the appropriate item in the Context box before going on.
- Scroll down to the Camera Clipping Planes item. Or choose the item you want to change.
- Click the Color drop-down list and choose a color. You can choose a standard color or click Select Color to specify any color you want.
- Click Apply & Close.
- Click OK to return to your drawing.
Here was his response:
“Hey Ellen, looks like you nailed it. I also chose Restore Classic Colors and that fixed it up nice as well.”
What interface item colors do you change? How does the new color help you? Leave a comment!
- Combine or subtract 2D shapes to create custom shapes - February 17, 2022
- Working with linetype scales - January 18, 2022
- Rename named objects–blocks, dimension styles, layers, and more - December 21, 2021


 Instagram
 LinkedIn
 Facebook

Hi Ellen thanks for a very useful tip, much appreciated.
Now onto something completely different but still to do with colors, I am “color blind”,
so finding it difficult with the yellow and green as I see them as one color on my screen, the same with the cyan and white, is there any setting in my computer that I can change to make the green
a slightly different shade so it doesn’t look the same as the yellow and the same with the cyan,
just a slight different shade so it looks different to the white, but this must only be a visual
setting for my computer and not the drawing or affect other users when they open my drawings.
I hope this makes sense, or maybe it only makes sense to color blind people, I am not sure if you had a request of this nature before. Kind regards Kurt.
Kurt,
Changing colors of the screen, as discussed in this post, doesn’t change the drawing. If you’re asking about changing colors of objects the drawing, that’s a great question and I don’t know a quick answer. But an AutoLISP routine could change every object/layer that uses a specific color to another color. It could save the original colors and then another routine could change them back. I’m not a programmer, but this sounds very possible. It sounds pretty simple to me and I think you could commission someone to do that inexpensively. It seems like such a real need, I wonder if someone hasn’t already done it. OK, I just did a search on AutoCAD color-blindness and there seem to be some promising items. Go check it out!
Hi Ellen,
I just change my model space and block editor backgrounds to black. Paper space I leave white as we normally print on white paper, sometimes though I may change model to a shade of grey if I am doing an automotive wiring diagram.
In a layout tab, with “Display paper background” enabled, the paper background color is configurable. But the area outside the paper background is a light gray and there is no place to change it… or is there????
Ellen,
As always, I love your topics but it is never as easy for me.
My problem seems to be with the Windows colors for AutoCAD being different than for Office applications.
In Windows 7, the top window (title bar) is a washed-out light blue with black letters for the file name, or tab names in their browser.
For some reason, for AutoCAD it is WHITE over washed-out light blue. This makes it low-contrast and unreadable in poor lighting. The only choices i have seen for “Color Scheme” are dark and light (NOT high-contrast, as I desire) and the font selections only apply to the command line.
I found a solution, but have not yet tried it since i do not want to screw up the installation if the code has a typo. http://adndevblog.typepad.com/autocad/2013/01/changing-the-displayed-autocad-title-bar-text.html
I am also color blind and the clasic colors are great, except for the layer dialog box with the gray background I cannot tell if layers are on/off or frozen/thawed.
I tried “CLASSICLAYER” which fixes the colors, but completely effs up the dialog box… cannot work without closing the stupid box
My hardest to see background colors is in the “Places List” in the Open, because Microsoft obsoleted the “Advanced Appearance Settings” in Windows 10.
————This is a step by step for those who are nervous or lacking modifying their registry———
I found my color by typing “COLOR” in the command prompt in AutoCAD, “TRUE COLOR” tab, selected inside the box for a close view and then used the slide bar to darken or lighten.
Then your RGB number will be listed.
Highlight and Copy your “RGB Color”
1. Select the Window icon on you Taskbar
2. Type “REGEDIT” and hit “Enter”
3. Select “YES”
This is only for nervous poeple like me. I select the “FILE”
dropdown and “EXPORT” a copy to my desktop.
4. then double click “Computer” to open the full tree,
unless it’s already open to the full tree.
5. double click “HKEY_CURRENT_USER”
6. double click “Control Panel”
7. double click “Colors”
8. double click “InactiveTitle”
9. In the “VALUE DATA” paste your value of your
chosen Color or Shade. Remove commas and
leave the space in between the numbers.
10. Restart your PC
My hardest colors to see is in the Places List when I open a drawing due to Microsoft obsoleted the “Advanced Appearance Settings” in Windows 10.
————This is a step by step for those who are nervous or lacking modifying their registry———
I found my color by typing “COLOR” in the command prompt in AutoCAD, “TRUE COLOR” tab, selected inside the box for a close view and then used the slide bar to darken or lighten.
Then your RGB number will be listed.
Highlight and Copy your “RGB Color”
1. Select the Window icon on you Taskbar
2. Type “REGEDIT” and hit “Enter”
3. Select “YES”
This is only for nervous poeple like me. I select the “FILE”
dropdown and “EXPORT” a copy to my desktop.
4. then double click “Computer” to open the full tree,
unless it’s already open to the full tree.
5. double click “HKEY_CURRENT_USER”
6. double click “Control Panel”
7. double click “Colors”
8. double click “InactiveTitle”
9. In the “VALUE DATA” paste your value of your
chosen Color or Shade. Remove commas and
leave the space in between the numbers.
10. Restart your PC