
Sometimes you need to create a 2D profile that is a combination of the basic geometrical shapes that AutoCAD creates. While you might be able to use the PLINE command to create what you want, in some cases, 2 other methods may be easier.
Subtract shapes with the SUBTRACT command
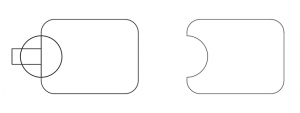
For example, let’s say that you want to create this profile.

Depending on the information you have about the radius of the circle and length of its inset, it might be easier for you to start with these objects:

Here is one way to get the result you want:
- Draw the large filleted rectangle, the 2 small rectangles and the circle.
- Start the REGION command.
- Select all 4 objects and end selection. You’ll see a message: 4 loops extracted. 4 Regions created.
- Start the SUBTRACT command. This command isn’t on the ribbon in the 2D Drafting & Annotation workspace, so just type the command on the Command line.
- At the Select solids, surfaces, and regions to subtract from .. Select objects: prompt, select only the larger filleted rectangle and end selection.
- At the Select solids, surfaces, and regions to subtract .. Select objects: prompt, select the 2 small rectangles and the circle. Then end selection.
AutoCAD subtracts the smaller regions from the larger one, leaving just the desired profile.
Combine shapes with the UNION and INTERSECT commands
You can also use the UNION command to turn the 4 regions on the left to the region on the right.

Finally, you can use the INTERSECT command to find the intersection of 2 regions, as you see here.

Use the BOUNDARY command to create regions and polylines
 The BOUNDARY command can work like the SUBTRACT command. With the BOUNDARY COMMAND, you can do the following:
- Draw the shapes on the left, below.
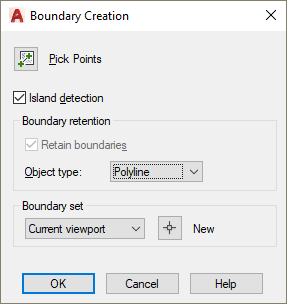
- Start the BOUNDARY command to open the Boundary Creation dialog box.
- If you want to also create objects from nested objects (inside the boundary of an outer object), check the island Detection checkbox.
- Choose Region from the Object Type drop-down list and click OK. If all you want to do is create the shape on the right, you can choose Polyline from the drop-down list, but you won’t be able to union, subtract, or intersect them.
- At the Pick Internal Point prompt, click inside the object or objects that you want to turn into polylines or regions. Press Enter to end the command.
- You can now use UNION, INTERSECT, or SUBTRACT the regions.
Note: The BOUNDARY command creates the new objects ON TOP OF the original objects. Move them to see the original objects.
Tip: Once you have the shape you want, you can reuse the BOUNDARY command, choose Polyline, and create a polyline. Remember to move the new polyline from on top of the original region.
Another neat trick suggested by our reader is to create a rectangular region with subtracted circular areas as a means to define model viewports (Mviews) in layouts (or paperspace) with a masked area or areas for enlarged details. Step by step as follows:
1) Create a rectangle
2) Inside the rectangle create a circle.
3) Use the “region” command to convert both the rectangle and circle to regions.
4) “SUBTRACT” the circle region from the rectangle region.
5) Now use the mview command with the “Object” option.
The circle will be a masked area in the viewport. You can then add a circular viewport in the masked circle for an enlarged detail.
How about you? Do you use regions in 2D drawings, to combine/subtract them or for some other purpose? Leave a comment!

- Combine or subtract 2D shapes to create custom shapes - February 17, 2022
- Working with linetype scales - January 18, 2022
- Rename named objects–blocks, dimension styles, layers, and more - December 21, 2021


I think there is a better way, like:
you draw whatever you like.
after you getting the result you need, simply press the command BO (for boundary), and press on the middle of the area you’ve got.
and its creating you a polyline shape.
just like we all want 🙂
One neat trick I’ve used is to create a rectangular region with subtracted circular areas as a means to define model viewports (Mviews) in layouts (or paperspace) with a masked area or areas for enlarged details:
1) Create a rectangle
2) Inside the rectangle create a circle.
3) Use the “region” command to convert both the rectangle and circle to regions.
4) “SUBTRACT” the circle region from the rectangle region.
5) Now use the mview command with the “Object” option.
The circle will be a masked area in the viewport. You can then add a circular viewport in the masked circle for an enlarged detail.
Very cool!
when performing subtract in autocad 3d the object disappear , can i get help plz ?
Where to get a good teaching resource for 9-10 yr old just learning about how shapes work. Naming and making models..Im a parent from the old school wish.i had goggle. Thanks Rose
Very good thank you for this tutorial AutoCAD can be very simple when explained clearly. Thanks
Very good, but was just wondering do you have a tutorial to achieve this in 3d. I have a shape combination I need to do and I am sure it can be done on the AutoCAD software I have but up to now I have been unsuccessful. Thanks in advance.
I prefer to use PLINE to draw these simple shape like these one. But thanks for sharing.
Thanks for sharing.