
Sometimes you need to rotate a block or object to match the angle of an existing object. Here’s one way to accomplish that, using the Reference option of the ROTATE command.
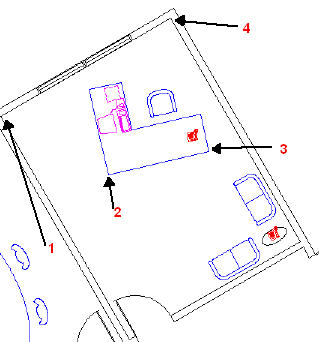
In this example, you want to rotate the desk to match the rotation of the end wall. Follow these steps:
- Start the ROTATE command and select the objects that you want to rotate.
- At the Specify base point: prompt, specify the base point of the object you want to reference to, not the base point of the object you want to rotate. This is point 1 in the above figure.
- At the Specify rotation angle or [Reference]: prompt, choose the Reference option.
- At the Specify the reference angle <0>: prompt, pick the point on the object that you want to rotate that corresponds to the base point you just specified. This is point 2 in the figure.
- At the Specify second point: prompt, pick the second point that, together with the previous point, specifies the angle of the object that you want to rotate. This is point 3 in the figure. Notice the rubber band line from your base point (point 1) connecting to your object as you move the cursor, as shown below:
- At the Specify the new angle: prompt, pick the point on the reference object that, together with its base point, specifies the angle of the reference object. This is point 4 in the first figure.
## Dynamic block is another great productivity tip to master. Sign up below to get your Free tutorial on creating a complete dynamic block, including a drawing to practice on. You’ll make a movable chair, resizable desk, and more.
Sanjay Kulkarni suggests another way to use the Reference option of the ROTATE command and end up with the same result. Sanjay is a technical writer, CAD trainer & programmer, and consultant based in Pune, India.
Use Reference option of ROTATE command
- Start the ROTATE command and select the objects that you want to rotate.
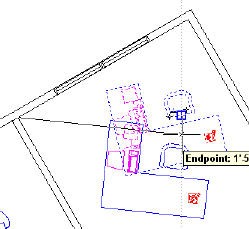
- At the Specify base point: prompt, specify the base point of the object that you want to rotate. In the top image, that would be point 2.
- At the Specify rotation angle or [Reference]: prompt, choose the Reference option.
- At the Specify the reference angle <0>: prompt, pick the point on the object that you want to rotate that corresponds to the base point you just specified. This is point 2 in the figure. So you’re picking point 2 again.
- At the Specify second point: prompt, pick the second point that, together with the previous point, specifies the angle of the object that you want to rotate. This is point 3 in the figure.
- At the Specify the new angle: prompt, choose the Parallel object snap. (Shift + right-click and choose Parallel) This OSNAP works in an interesting way, something like acquiring a tracking point. Move the cursor over the line you want to align to, in this case the line from points 1 to 4. Then move the cursor around to rotate the desk until you see a dotted extension line. You’ll feel the desk “snap” along that line. Then click to complete the ROTATE command.
New Update – Use ALIGN command
A few of you commented that ALIGN command is a more intuitive option, with less steps to achieve the same result. And you do not need to reposition the object. With ALIGN command, remember that “Source” is the object, “Destination” is the reference line.
- Type in ALIGN command and select the object that you want to rotate.
- At Specify first source point: Click the base point of the object that you want to rotate.
- Then select first destination point, which can be at any point of the reference line of which you wish the object to align to.
- Repeat and specify second source point: click the end point of the object you wish to rotate.
- At specify second destination point, click another point along the reference line.
- Then select CONTINUE. And as we do not wish to change the scale of the object with this example, select NO then ENTER
Trim the circle in half and use PEDIT
Jon e-mailed me with the following additional solution: If you use a circle and trim it in half, pedit that, you can then give the resulting pline arc thickness, mirror it and pedit join it into a circle.
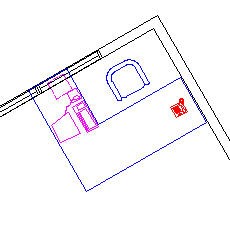
The selected object rotates to match the angle of your reference object, as you see here. Then move the object to its proper location.
Which method do you use? Or do you have another method? Leave a comment!
Want more productivity tips like this? You can draw and edit faster and easier with this easy to follow top 25 productivity tips every AutoCAD user should know.


- Combine or subtract 2D shapes to create custom shapes - February 17, 2022
- Working with linetype scales - January 18, 2022
- Rename named objects–blocks, dimension styles, layers, and more - December 21, 2021


Thanks!
Awesome. Thanks so much!
Very slick guys. Two great tips that will save me hours of time. Thanks
It seems that every time you want to rotate using a reference angle, you’ll end up picking the basepoint two times. I find this very anoying, how can I get Acad to automaticly pick the base point as the first point of the reference angle?
What about using the ALIGN command – the same result without picking the base point twice? All you need is reference line.
Thanks so much! This command has frustrated me for awhile but I think these recommendations clear up my confusion. Much appreciated!
Wow, simple and clear description. Just been looking for this elsewhere and it was clear as mud. Thanks a lot, very helpful.
THANKS~!
The ALIGN command as mentioned by AbDeFleur is a far better tool to use than ROTATE. It is way more intuitive, takes less inputs with less hand movement required and for the example shown here would eliminate the need to re-position the elements.
THE ALIGN COMMAND IS FAR MORE FASTER AND EASIER TO USE
AS STATED PREVIOUSLY
4 PICKS TOTAL SIMILAR TO ALIGN MODEL TO PAPERSPACE_
ALIGN command is not included in LITE version, so this is the only way for LITE users like me.
This was very helpful
Thank you very much.
thanks!
Haven’t used acad much in last several years. What happened to the rotate through command?…it was easy to use. I have a very hard time with the new ways.
Thanks
Simple instruction.Its very helpful
I find easier to rotate the snapang (snapang;perpendicular,nearest or endpoint)to the desired angle then with ortho on rotate the object(s). Then I can rotate multiple objects say from an exploded block with several objects in it which need to be rotated to the new angle. Be sure to reset snapang to 0. This sounds like a lot but I have the pair of snapang on a popup right click menu so for me it is click on menu item click the line to rotate the cursor to and rotate. Then it’s one menu click to snapang the cursor back to 0.
Thanks very much,this instruction is clear,simple and helpful for me
@Sanjay Kulkarni – thanks , it was really helpful .
Thanks a lot, instruction was very helpful
Thanks a lot, this is a really simple and handy guide.
Excellent , Thanks.
omg.. before I just randomly rotate my objects or measure my reference drawing manually I feel stupid XD
Thank You! Greetings from Mexico!
I have a submission tomorrow and i was just freaking out and tryinh different stuff. It really helped thankyou so much!
Worked great! Thank you!
Thank you so much for making this article, it really helps me with knowledge.. Of course the good Karma will come to you for doing good things.. thanks
I need to do this one in a million commands and rely on my own convoluted way. I am so excited I finally took the time to research this and found your article. Thank you! Can’t wait to use it more!
I made a video tutorial on youtube that demonstrates this, it might help. https://youtu.be/Xrc3tkJUnck ericcad.
Thank you so much 🙂 the most clear definition of the tool!