
Need to create a drawing at an angle? AutoCAD offers several options.
Use polar tracking to guide you
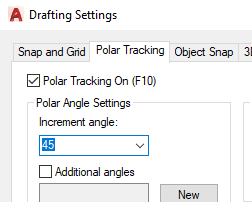 Right-click the POLAR button on the Status bar and choose Settings or click its down arrow and choose Tracking Settings. Set the angles you want and click OK. For example, a 45° angle will display tracking guides every 45°. Click OK. Now you can use polar tracking and direct distance entry (just type in the distance of a line) to draw.
Rotate the crosshairs
- Thanks to Garry Stack of CADCO in Cork, Ireland for his tip suggesting this method. He likes it better because he finds that the tracking guides get in the way. To rotate the crosshairs, right-click the SNAP button on the Status bar and choose Settings. Type a value, such as 45° for the Angle and click OK. Now your crosshairs are at that angle. However, you need to use ORTHO to use direct distance entry using this method. Garry suggests making toolbar buttons for commonly used angles. For example, the macro to rotate the crosshairs 45° would be ‘snapang;45; I think it would be useful to have a ‘snapang;0; toolbar button as well. Lots of people seem to like this tip. Jack Foster writes that he has a button with the following macro: snapang;0;;\ This sets the snap angle to 0 regardless of what it currently is, then goes back to the snapangle variable and waits on the user to type in the new angle you want. Matt Doyle likes this version: ^C^Csnap;r;\\;off; This lets you set the angle by picking two points, then shuts off the snap command (which otherwise is turned on and snaps you to the grid). Ian Matthews contributed this pair:
‘snap r 0,0;per;
‘snap r ;0;
The first one matches the cursor of a line you select. The second one returns the snap angle back to 0. He puts these on two toolbar buttons. - Jon Jonas prefers using the command prompt, so he defines two commands using AutoLISP:
(DEFUN C:SNR ()
(SETQ PT1 (GETPOINT “\nSELECT ORIGIN POINT: “))
(SETQ PT2 (GETPOINT “\nSELECT POINT ALONG ROTATION: “))
(COMMAND “SNAP” “RO” PT1 PT2)
(COMMAND “SNAP” “OFF”)
)
(DEFUN C:SN0 ()
(COMMAND “SNAP” “RO” “0,0” “1,0”)
(COMMAND “SNAP” “OFF”)
)
He explains, “SNR sets the snap angle up using 2 points while SN0 (S-N-Zero) resets it back to zero… Simply place it in the acad.lsp file and you are good to go.”
- Nick Louis says, to change your crosshair angle, just type in snapang at the command prompt, then hit Enter. Now simply type the angle you want. Or, type the code below in your acad.lsp file and reload the acad.lsp file. Then just type sa for Snap Angle.
(DEFUN C:sa ( ) (COMMAND “snapang”))
Create a User Coordinate System (UCS)
- To rotate the axes by 45°, choose Tools>New UCS>Z and type 45. Press Enter. (Or, as Jimmy Wesley suggests, type ucs, z and type 45.) You can use Polar Tracking with this UCS if you wish. Typing relative coordinates will be simplified (for example, @3,0 instead of @3<45). Jimmy further suggests a quick way to return to the default axes: type ucs and press enter twice. Andrew Hudson suggests creating your UCS this way. Draw a line at the angle you need, such as 7.6 degrees. Choose Tools > New UCS > Object. At the prompt, pick the line nearest the end that you want to be your new 0,0 point. Alan Praysman has a custom toolbar button that works as a toggle to rotate the UCS and then restore the WCS. To rotate the UCS, click the button and pick the endpoints of a line to specify the angle. Here’s the code:
(if (equal (getvar “ucsxdir”) (list 1.0 0.0 0.0))(command “ucs” “new” “z”)(command “UCS” “world”));
- Alan Ball from Auckland, New Zealand submitted: “I find the easiest way is to use the UCS command and type in 3. The command then asks for the 0,0,0 point and the X and Y axes. The 3 option vanished from the options shown as available with the UCS command a few years back, but is still available to use and is very handy if you don’t know the angle…you are working with.

- Combine or subtract 2D shapes to create custom shapes - February 17, 2022
- Working with linetype scales - January 18, 2022
- Rename named objects–blocks, dimension styles, layers, and more - December 21, 2021
 Instagram
 LinkedIn
 Facebook

Thanks Garry, just what I was looking for 🙂
Great website too 🙂
I appreciate Alan Ball’s comment. Prior to 2012, “UCS Z” functioned slightly differently. I could type “UCS Z” then “PER” and select a line that I wanted the UCS to be orthogonal to. It was very quick and easy, and worked on xrefs (where UCS Entity (or Object, same thing) didn’t work). It’s really a shame that the functionality changed.
Alan’s method is just about as effective, it just requires one extra mouse-click and one extra . So thanks for that.
AGAIN AND AGAIN THANKS