In this tutorial, I’ll explain the steps for creating a new toolbar using the Customize User Interface dialog box. This dialog box is new for 2006 and the method of customizing toolbars, menus, etc. is very different from previous releases.
- Choose Tools>Customize>Interface, or type cui on the command line.
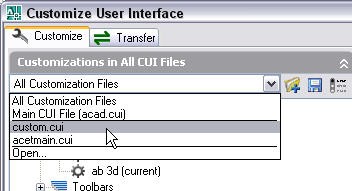
- Click the drop-down list at the top of the Customize User Interface dialog box and choose custom.cui. This is a partial customization file and lets you create a toolbar without fiddling with your main menu file.
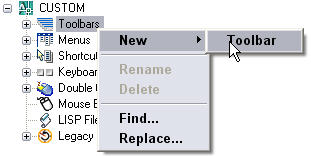
- Right-click the Toolbars item in the main panel of the dialog box and choose New>Toolbar.
- The new toolbar, named Toolbar1, appears under the Toolbars item. It is selected, so immediately rename it.
- To see the toolbar in the drawing area, click Apply. It’s very small, because it doesn’t have any buttons yet.

- The easiest way to add a button is to drag a command from the Command List panel at the bottom-left section of the dialog box. However, the AutoCAD commands don’t all appear because you are now working with the Custom partial customization file. From the drop-down list at the top of the dialog box, choose All Customization Files.
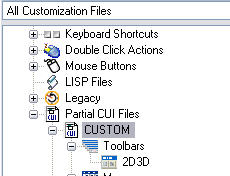
- Unfortunately, this collapses the new toolbar that you created on the list. To find it again in the top pane, double-click Partial CUI Files, then double-click CUSTOM, then double-click Toolbars. You should now see your new toolbar.`
- From the Categories drop-down list in the Commands List pane, make sure that All Commands is chosen.
- Scroll down to a command that you want to add (they’re alphabetical) and click it. Tip: You can type the first letter of the command to jump to the first command starting with that letter.
- Drag the command up to your toolbar, until you see a small left arrow pointing to your toolbar. Then release the mouse button. This adds the command to your toolbar.
- Continue to drag commands. You can drag them above or below the first button.
- You can create your own button if the command you want to use doesn’t have one. For example, the ALIGN doesn’t have a toolbar button. To create a button, select the command in the upper pane of the dialog box. Then click the Edit button in the Button Image section.
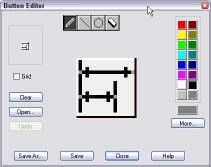
- Use the Button Editor to edit an existing button or create one from scratch. To edit an existing button, click one of the buttons in the Button Image section. Use the tools at the top and pick a color along the side to draw. Use the Eraser tool to erase.
- When you’re done, click Save As and save the button as a BMP file. Remember the location! Click Close to exit the Button Editor. Here’s my ALIGN button.
- To assign the image to the button, click the Small Image item in the Properties pane. Click the Ellipsis button and browse to your BMP file.
- To create a new, custom command, click the New button in the Command List section.
- In the Properties section, complete the command name, a description, and the menu macro. Choose an image or create one in the Button Editor.
- You’ll see the new command on the Command List. Drag it to your toolbar.
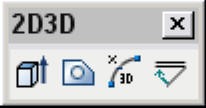
- Click Apply to see the toolbar. You may need to move the dialog box. If you like it, click Close. Otherwise, make any desired adjustments. Here’s my final toolbar, enlarged. It contains buttons for the EXTRUDE, REGION, and ALIGN commands and a custom command that uses the ROTATE3D command to rotate the selected object around the X axis.




Latest posts by Ellen Finkelstein (see all)
- Combine or subtract 2D shapes to create custom shapes - February 17, 2022
- Working with linetype scales - January 18, 2022
- Rename named objects–blocks, dimension styles, layers, and more - December 21, 2021

 Instagram
 LinkedIn
 Facebook
Good afternoon,
I have a request. What would be the process to create an icon which would allow me to turn off and/or off a specific layer?
I am using ACAD 2012.
Thank you for your input.
Regards,
Joe
Go to https://allaboutcad.com/autocad-tips/#Customization and look through the tips. there are several that deal with creating a custom command and customizing the menu (ribbon or toolbar).
I am having a terrible time trying to add a new pull down menu. I am using 2006 AutoCAD and the last time I got it to work by adding an old “.mnu” file, but I can’t seem to find that file so I was going to get the “.cui” file off my computer and move it over to the new computer. I have tried several times to get it to load with no success. Can you give me any help in fixing this? The new pull down add several custom blocks and are needed pretty bad.
Have you tried typing “cuiload” and a dialog box will come up that says Load/Unload Customizations.Go to browse and find your “.cui” file click on it & hit open. It will then show up under the file name in the Load/Unload Customizations dialog box,click on the load button. This is what I have done when trying to get a customized menu to load. Hope this works for you.
Jerry
how to associated a *.DVB file whit a button.
Dear Ellen,
I have few blocks and i want to add that into a new toolbar and also in a menu. Could you please help me to achieve what i’m looking for.
Thanks
Rijnas
See if this helps: https://allaboutcad.com/keep-blocks-accessible-so-you-can-insert-them-in-any-drawing-part-i-tool-palettes/
I also have a few posts on creating toolbars and custom menus.
Ellen,
I know how the design centre and the tool palette works. But what i’m trying to do is a menu and a toolbar with my own custom made blocks in it. What i’m trying to achieve is to get the blocks in a single click from the toolbar or from the menu. And i’ll be using that as our cad standards.
Thanks
Rijnas
Building on what Ellen has said above for creating a custom toolbar, when you go into Customize User Interface, find your custom toolbar. At the bottom-left, make sure all commands are shown. Find the Insert Block command/icon and drag it up onto your toolbar, in the position you would like it to show on your toolbar. Click on the command that you just placed in your toolbar and, over at the right, after the word Macro (may be different, depending on your version of AutoCAD), you will see something like, ^C^C_insert. After this you need to type a semicolon and the name of your block, like this: ^C^C_insert; blockname . You can then click on the down arrow to the right of Button Image, above the properties box and select an icon or Edit and create your own. When you are done, click Apply at the bottom-right and the icon should appear on your toolbar, assuming you have it placed in the AutoCAD program window. It should insert your custom block when you click it on the toolbar.
Hi Ellen,
This has been very helpful. I have some customized icon made in 16×16 size. However, when I try to put them in Ribbon and display as large icon without text. It still shows the same icon size. Is there something I’m missing here? Thanks.
Linda
I’ve put a lot of my old toolbar icons in ribbon panels and when I’ve wanted them to display as large I have to double the size of the 16×16 icon to 32×32. I make a copy of the 16×16 image and resize it in Photoshop (though any image program should allow you to do this). When editing the panel in the CUI, you can specify the larger image at the bottom of the Button Image pane. Hope this helps.
Hi Ellen
I have installed a block libraries onto my tool bar when I click the symbol the command comes ups insertsert not insert and brings up an error. How do I change the command ?
Need a touch of help. I am trying to make a button to insert a symbol. I have the symbol as a short cut in lsp. When I try to make the button to work it just brings me to the insert command. Wish acad 12 was still around. Good grief I think I will go back to the board and velum. OH I am on acad 2015