Tool palettes can be a great place to store blocks, custom commands, and more. For example, in this post, I explain how to use tool palettes for blocks. And here I explain how to use tool palettes for user-defined hatches.
But what if you want to share them with others? You can share tool palettes by exporting them to a file. Then others import the same file to access the tool palettes.
 Export a tool palette or group to a file
Follow these steps to export a tool palette (or group) to a file:
- Choose Manage tab> Customization panel> Tool Palettes (the CUSTOMIZE command) to open the Customize dialog box. Note that each tab in the Tool Palettes window is a separate tool palette.
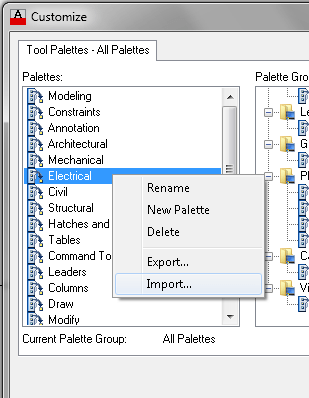
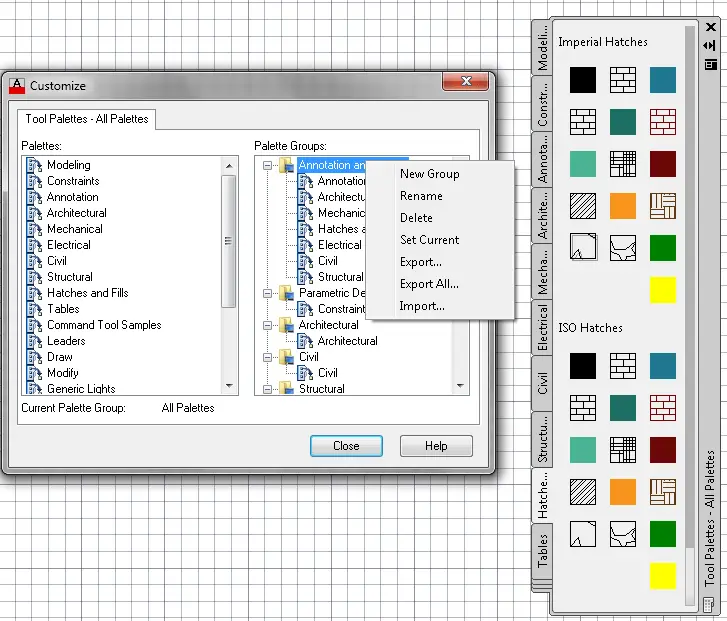
- Right click a tool palette or group and choose Export from the menu. To export all palette groups, right-click a palette group and choose Export All.
- In the Export Palette or Export Group dialog box, choose a location for the file. A tool palette will be an XTP file and a palette group will be an XPG file.
- Click Save.
Import a tool palette or group from a file
If someone gives you a tool palette file (XTP or XPG), here are the steps to import it:
- Choose Manage tab> Customization panel> Tool Palettes (the CUSTOMIZE command) to open the Customize dialog box.
- Right-click any palette from the left side of the dialog box and choose Import.
- Select the XTP or XPG file and choose Open to display the tool palette.

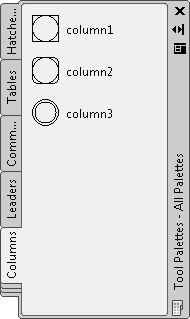
Here you see the custom tool palette that I imported:

- Combine or subtract 2D shapes to create custom shapes - February 17, 2022
- Working with linetype scales - January 18, 2022
- Rename named objects–blocks, dimension styles, layers, and more - December 21, 2021

 Export a tool palette or group to a file
 Instagram
 LinkedIn
 Facebook
[…] View the original article here […]
HELP on exporting tool palettes. We are trying to export the existing tool palettes from AutoCAD Architecture 2013 so that we can import on the new computer. I pulled up your instructions online and it was similar to the AA 3013 help. In the customize – tool palettes (all palettes) when I right click the only options I see are: Rename – New Palette – Delete.
I see nothing to “export” command. Can someone help? Thanks. Jeff
You want to export tool palettes from Autodesk® Architectural Desktop, but the right-click menu does not include the option to export tool palette, see an answer here: http://usa.autodesk.com/adsk/servlet/ps/dl/item?linkID=9240937&id=4393438&siteID=123112
Brgds,
Lars
Hello
I want to know if it is possible to have an intelligent tool pallet ex. if the variable X = 2, all the blocks are inserted with a scale of 2.
Tahnks,
Joh
John,
I have blocks I use for flagging deficiencies and locations of things as well as things like column callouts. These are created at the finish size for paperspace. In my pallet, under properties, I set all of them by their respective layers and SET auxilary scale to DIMENSION. then set your dimension style current and place your blocks, automatically on the correct layer and at the proper scale.
Sharing tool palettes should be as easy as shown above. However if you don’t have the Export Import options on the right click menu how are you supposed to share thru the network? I am running AutoCAD Architecure 2013. We are converting from a server base system to a cloud base and the tools we currently use will need to be recreated of converted. I recreated one and was trying to share it to the cloud and couldn’t figure out how to get the proper menu. Please tell me you have a suggestion.
I have not had to import/export a tool palette to any computer. We have them in a network location, go to options, file (tab), expand “Tool Palettes File Locations” and change the location to were you have your toolpattes. That works great for us.
I have exported and imported a tool palette that I created. For some reason, when I imported it to a different computer (on same network), I tried what you recommended. It still did not work. The images and the “files” are there but the source is broke. Please help!
is autocad and autocad electrical both are same or what.
This Is very helpful We have had to re-do many pallets because we didn’t know how to do this. Awesome
Thank you.
This’s going to be very helpful, but i don’t know much yet
I have done this. REPEATEDLY. There is an XTP file one of my colleagues made and I have imported it exactly as described here. However, once I close and reopen AutoCad, this imported XTP file is gone. I see no instructions on how to “save” – why does it disappear every time?
I should clarify that I have put the .xtp file in the same folder as all other palettes, so it’s in the file search folder listed in options. I’m using AutoCAD 2016.
; Devlopments Flange [detail-2] EIL Std:7-15-001 , Dtd :- 26-06-2011
(defun dtr (ang1) (* (/ ang1 180.00) pi))
; degree to radian conversion.
; inputs for flange
(defun c:inputs1 ()
(setq a1 (getreal “\n Enter The Outside Diameter (A) : “))
(setq bcd1 (getreal “\n Enter The Bolt Circle Diameter (BCD) : “))
(setq b1 (getreal “\n Enter The Inside Diameter (B) : “))
(setq g0 (getreal “\n Enter The Thickness of Hub at small End (G0) : “))
(setq g1 (getreal “\n Enter The Thickness of Hub at Back of Flange (G1) : “))
(setq h1 (getreal “\n Enter The Hub Height (H) : “))
(setq t1 (getreal “\n Enter The Thickness of Flange (T) : “))
(setq go1 (getreal “\n Enter The Gasket Outside Diameter (D) : “))
(setq gt1 (getreal “\n Enter The Thickness of Gasket (GT) : “) )
(setq w1 (getreal “\n Enter The Gasket Width (W) : “))
(setq no1 (getint “\n Enter The Number of Bolt (N0) : “))
(setq bd1 (getreal “\n Enter The Bolt Diameter (BD) : “))
(setq ang1 (getreal “\n Enter The Orientation angle of Flange :”))
) ; End of Inputs
(defun c:gsk1()
(if (= gt1 3.00)
(progn
(setq rf1 5.00)
(setq d1 (+ go1 3.00))
); End of Progn
) ; End of if
(if (= gt1 4.5)
(progn
(setq rf1 6.00)
(setq d1 (+ go1 11.00))
); End of Progn
); End of if
(if (= gt1 6.35)
(progn
(setq rf1 8.00)
(setq d1 (+ go1 11.00))
); End of Progn
); End of if
(if ( and (/= gt1 3.00) (/= gt1 6.35) (/= gt1 4.5)); End of and
(progn
(setq rf1 (getreal “\n Enter The Raise Face Thickness : “))
(setq d1 (getreal “\n Enter The Raise Face diameter : “))
); End of Progn
); End of if
); End of GaSKEt
(defun c:pnt1 ()
(command “-osnap” “”)
(setq cp1 (getpoint “\n Select the Point “))
(setq cp2 (polar cp1 (dtr (+ ang1 90.00)) (- (+ t1 h1) rf1)))
(setq cp3 (polar cp2 (dtr (+ ang1 90.00)) rf1))
; flange points defines
(setq p1 (polar cp1 (dtr (+ ang1 0.00)) (/ b1 2.00)))
(setq p2 (polar p1 (dtr (+ ang1 0.00)) g0))
(setq pt1 (polar p1 (dtr (+ ang1 90.00)) h1))
(setq p3 (polar pt1 (dtr (+ ang1 0.00)) g1))
(setq p4 (polar p3 (dtr (+ ang1 0.00)) (/ (- a1 (+ b1 (* g1 2.00))) 2.00)))
(setq p5 (polar p4 (dtr (+ ang1 90.0)) t1))
(setq p6 (polar cp3 (dtr (+ ang1 0.00)) (/ d1 2.00)))
(setq p7 (polar p6 (dtr (+ ang1 270.0)) rf1))
(setq p8 (polar cp2 (dtr (+ ang1 0.00)) (/ b1 2.00)))
(setq p9 (polar cp3 (dtr (+ ang1 0.00)) (/ bcd1 2.00)))
(setq p10 (polar p9 (dtr (+ ang1 270.00)) t1))
(setq p11 (polar p9 (dtr (+ ang1 180.00)) (/ (+ bd1 3.00) 2.00)))
(setq p12 (polar p10 (dtr (+ ang1 180.00)) (/ (+ bd1 3.00) 2.00)))
(setq p13 (polar p9 (dtr (+ ang1 0.00)) (/ (+ bd1 3.00) 2.00)))
(setq p14 (polar p10 (dtr (+ ang1 0.00)) (/ (+ bd1 3.00) 2.00)))
; commnad drafting of flange
(command “pline” p1 p2 p3 p4 p5 p6 p7 p8 p1 “”)
(setq et1 (entlast))
(command “zoom” “e”)
(command “pline” p1 (polar p1 (dtr (+ ang1 180.00)) b1) “”)
(setq et2 (entlast))
(command “pline” p8 (polar p8 (dtr (+ ang1 180.00)) b1) “”)
(setq et3 (entlast))
(command “pline” p6 (polar p6 (dtr (+ ang1 180.00)) d1) “”)
(setq et4 (entlast))
(command “pline” (polar p9 (dtr (+ ang1 90.00)) 20.00)
(polar p10 (dtr (+ ang1 270.00)) 20.00) “” )
(setq et5 (entlast))
(command “chprop” et5 “” “lt” “center” “s” 25.00 “”)
(command “pline” p11 p12 “”)
(setq et6 (entlast))
(command “zoom” “e”)
(command “pline” p13 p14 “”)
(setq et7 (entlast))
(command “zoom” “a”)
(Command “mirror” et1 “” cp1 cp3 “”)
(setq et8 (entlast))
(Command “mirror” et5 “” cp1 cp3 “”)
(setq et9 (entlast))
(Command “mirror” et6 “” cp1 cp3 “”)
(setq et10 (entlast))
(Command “mirror” et7 “” cp1 cp3 “”)
(setq et11 (entlast))
(command “pline”
(polar cp1 (dtr (+ ang1 270.00)) 20.00)
(polar cp3 (dtr (+ ang1 90.00)) 20.00) “” )
(setq et12 (entlast))
(command “chprop” et12 “” “lt” “center” “s” 25.00 “”)
(command “zoom” “e”)
) ; end of c:pnt1
(defun c:blk1 ()
(setq blk_name1 (getstring t “\nEnter The Block Name “))
(command “-block” blk_name1 cp1 et1 et2 et3
et4 et5 et6 et7 et8 et9 et10 et11
et12 “” )
(command “zoom” “e”)
(command “-insert” blk_name1 cp1 “” “” “” )
(command “zoom” “e”)
) ;End of Block function
(defun c:bc1 ()
; Input Data for Shell
(command “-osnap” “”)
(setq cp4 (getpoint “\n Select The point : “))
(setq cp5 (polar cp4 (dtr (/ (/ 360.00 no1) 2.00)) (/ bcd1 2.00)))
(command “circle” cp4 “d” b1)
(command “circle” cp4 “d” a1)
(command “circle” cp4 “d” d1)
(command “zoom” “e”)
(command “circle” cp4 “d” bcd1)
(setq et13 (entlast))
(command “chprop” et13 “” “lt” “center” “s” 25.00 “”)
(command “circle” cp5 “d” (+ bd1 3.00))
(setq et14 (entlast))
(setq cp10 (polar cp5 (dtr (/ (/ 360.00 no1) 2.00)) (+ bd1 3.00 5.00)))
(setq cp11 (polar cp5 (dtr (+ (/ (/ 360.00 no1) 2.00) 180.00)) (+ bd1 3.00 5.00) ) )
(command “pline” cp10 cp11 “”)
(setq et17 (entlast))
(command “chprop” et17 “” “lt” “center” “s” 5.00 “”)
(command “-array” et14 et17 “” “p” cp4 no1 “” “”)
(setq cp6 (polar cp4 (dtr 0.00) (+ (/ a1 2.00) 50.00)))
(setq cp7 (polar cp4 (dtr 180.00) (+ (/ a1 2.00) 50.00)))
(command “pline” cp6 cp7 “”)
(setq et15 (entlast))
(command “chprop” et15 “” “lt” “center” “s” 25.00 “”)
(setq cp8 (polar cp4 (dtr 270.00) (+ (/ a1 2.00) 50.00)))
(setq cp9 (polar cp4 (dtr 90.00) (+ (/ a1 2.00) 50.00)))
(command “pline” cp8 cp9 “”)
(setq et16 (entlast))
(command “chprop” et16 “” “lt” “center” “s” 25.00 “”)
) ;ENd of BCD
(defun c:detail2 ()
(c:inputs1)
(c:gsk1)
(c:pnt1)
(c:blk1)
) ;End of detail-2
(defun c:detail12 ()
(setq t3 (getreal “\n Enter The Thickness of Tubesheet (T3) : “))
(setq rf2 (getreal “\n Enter The Raise Face Thickness : “))
(setq cp1 (getpoint “\n Select the Point “))
(setq cp2 (polar cp1 (dtr (+ ang1 90.00)) t3))
(setq p1 (polar cp1 (dtr (+ ang1 0.00)) (/ (- b1 3.00) 2.00)))
(setq p2 (polar p1 (dtr (+ ang1 90.00)) rf2))
(setq p3 (polar p2 (dtr (+ ang1 0.00)) (- (/ go1 2.00) (/ (- b1 3.00) 2.00))))
(setq p4 (polar p3 (dtr (+ ang1 90.00)) (- t3 (* 2.00 rf2 ))))
(setq p5 (polar p4 (dtr (+ ang1 180.00)) (- (/ go1 2.00) (/ (- b1 3.00) 2.00))))
(setq p6 (polar p5 (dtr (+ ang1 90.00)) rf2))
; command for tubesheet drawings
(command “pline” p1 (polar p1 (dtr (+ ang1 180.00)) (- b1 3.00)) “” )
(command “pline” p6 (polar p6 (dtr (+ ang1 180.00)) (- b1 3.00)) “” )
(command “pline” p1 p2 p3 p4 p5 p6 “” )
(setq ts1 (entlast))
(Command “mirror” ts1 “” cp1 cp2 “”)
)