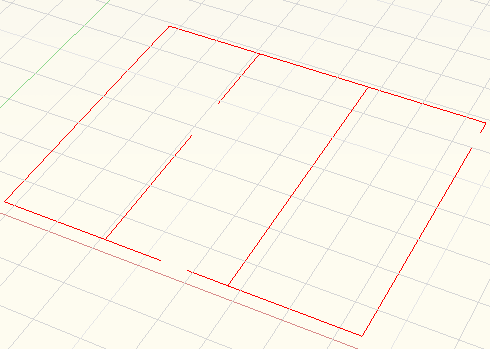
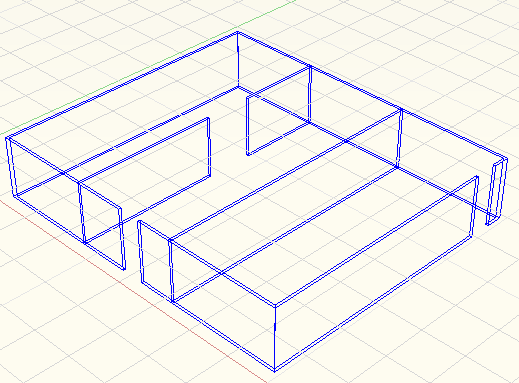
Polysolids are like 3D polylines that come with a thickness. You can use them to quickly create walls based on a 2D floor plan. The result is a swept solid. You can also draw polysolids without a 2D floor plan, by just specifying points, but here I use existing objects as a basis. Follow these steps:
- Draw the 2D floor plan with lines or polylines. Use architectural units. You should be in the 3D Modeling workspace.
- Create a new layer for the walls and make it current.
- Set a view that will let you see the 3D walls. For example, display the View toolbar and choose SE Isometric. In 2009, choose Home tab> View panel> View drop-down list> SE Isometric.

- Set the value of the DELOBJ system variable to 0 if you want to retain the 2D objects.
- To start the POLYSOLID command, choose Polygold from the Modeling toolbar. In 2009, choose Home tab> 3D Modeling panel> Polysolid.
- At the Specify start point or [Object/Height/Width/Justify] <Object>: prompt, type h and press Enter.
- At the Specify height <0′-4″>: prompt, type 8′ and press Enter to create 8′ high walls.
- At the Specify start point or [Object/Height/Width/Justify] <Object>: prompt, type w and press Enter.
- At the Specify width <0′-0 1/4″>: prompt, type 4 and press Enter to create 4″ wide walls.
- At the Specify start point or [Object/Height/Width/Justify] <Object>: prompt, press Enter to choose the Object option.
- At the Select object: prompt, select one of the lines or polylines that make up the 2D floor plan. (You can select only one object at a time.) AutoCAD creates the wall.
- Repeat the POLYSOLID command. It retains your settings, so just press Enter to use the Object option and select another line or polyline from the floor plan. Continue until you’re done.

Latest posts by Ellen Finkelstein (see all)
- Combine or subtract 2D shapes to create custom shapes - February 17, 2022
- Working with linetype scales - January 18, 2022
- Rename named objects–blocks, dimension styles, layers, and more - December 21, 2021

 Instagram
 LinkedIn
 Facebook
I know how to create Walls, windows, doors, floors, and etc in 3D. My problem is how to include furnitures, toilets, sink, Flowers and etc. in a 3D Floor Plan.
AutoCAD comes with some samples, but you often have to build those objects yourself. You can also buy collections of blocks. Some manufacturers give away blocks of their projects.
yes, thanks a lot! but I have another comment:
after downloading a 3D cad symbol and inserting it in a drawing, it transmute(from a conceptual view to like a rolling transparent wire mess then back to its conceptual view)when the XYZ-UCS icon touches it or place on top of it. You can’t move this XYZ-UCS icon until the transmutation stops. I don’t have no idea why this happens. Is there any way to stop the transmutation process and keep the inserted symbol stable?
what do you mean by the UCS icon touching it? Do you mean when you click a point on it and the UCS jumps to it? I don’t see the object change, but I think that what you see is so you can pick hidden points. When the UCS icon jumps to it, it’s so you can move, rotate or resize it.
On the Home tab in the 3D Modeling workshop, in the Selection panel, there’s a Gizmo drop-down list. Trying choosing No Gizmo and see if this helps.
we have to click the object when we want to move it or apply modifications. But this toilet object I downloaded from KOHLER and inserted or not to my drawing behaves to transmute when i even try to click on it. the UCS should touch the object if you wanted to cick on it. so there, as it transmute the mouse is paralyzed for about 8 secs.
but I can’t find the Gizmo drop-down list you are saying. Maybe that is only available to latest AutoCAD. mine is AutoCAD 2009.
Thanks for your time and for your website. It helps us to learn more.!
I am a 3D AutoCAD student looking for 3D Blocks of french doors, dresser, nightstand, tables. Can anyone suggest places to look?
Is there a function that causes the polysolid wall to be made up of predefined Wall Sections? eg. drawing a 7m polysolid wall, autocad would recognise that it is made from 7x 1m sections.
This is useful.
I want to know that in Auto CAD 2013, is there any possibility to create planes without moving or rotating UCS?
And, could you please explain that how to handle UCS in 3D modelling(in Auto CAD 2013)?
I think the answer to your question is – no.
As I understand things, you can only draw things in reference to the current UCS “plane”. Sometimes it helps me to set the drawing view different from the UCS so I can tell the z-direction (my UCSFOLLOW is usually OFF). As for me, I can rarely insert a 3D block and have it be properly oriented. I have come to expect that I will have to rotate the block once inserted. But, I think I am now starting to diverge from your question……
Amazing Helpful
How we can make 3D stairs in AutoCAD 2006. In this lesson we will learn that what is stair and why we use this on http://thisreals.com/how-we-can-make-3d-stairs-in-autocad-2006.php
Hi Ellen,
First of all i want to really appreciate you for this nice info about autocad software. I want to ask one thing that how we can handle UCS if we are working on a 3d modelling in cad2013. Please suggest me some tips.
Thanks and keep posting.
Great tutorial,,
http://www.3dfloorplanz.com
Hi Ellen,
First of all thanks for starting this blog. It has been very helpful. So, here is the issue i am facing. I am trying to create an isometric view. Since I am a novice, I am creating the view using 2D commands but recently I noticed, everytime I draw a line, it automatically picks up a height. Am not sure if I clicked some settings to make it happen and i am unable to undo this. Any advise from you would be great. Thanks.
Drawing of Polysolids was really tough before I getting to this post…This post clarifies the all tips and tricks and helped me a lot.
Once you have the wall, how do you put windows in it?
Baguio
have you got UCSfollow turned on?
Hans
Kay
Turn off Thickness
hi ellen,
how to remove /deleting the polysolid that already created before, any advise ? thanks
Hii
nice tutorial, thks
Hi! I am using AUTOCAD 2006 i have problem with converting 2d walls to 3d. Is there is any command with out Extrude which is not need to boundary for walls
Polysolids are like 3D polylines that come with a thickness. You can use them to quickly create walls based on a 2D floor plan. The result is a swept solid. You can also draw polysolids without a 2D floor plan, by just specifying points, but here I use existing objects as a basis.