
A region is an interesting type of AutoCAD object. You can think of it as a 2D surface. Regions are always closed and they look like polylines, but AutoCAD can do some interesting things with regions, such as:
- Calculate centroid, moments of inertia, and products of inertia
- Extrude them to create 3D solids
- Combine (UNION command), subtract, and intersect them to create complex shapes
Follow these steps to create a region:
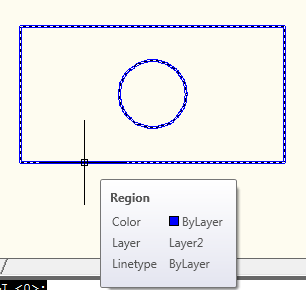
- Draw objects that create a closed area. You can use closed polylines, closed splines, circles, ellipses, and a combination of lines, arcs, and elliptical arcs. The objects cannot intersect (like a figure 8). Here’s a simple example:

Objects for a region
- If you want to keep your original objects (and create new regions, rather than converting the original objects to regions), type delobj on the command line. At the Enter new value for DELOBJ <1>: prompt, enter 0.
- Start the REGION command.
- At the Select objects: prompt, select all of the objects (including any internal objects, such as the circle inside the rectangle in the image you see here). End selection.
- To subtract the circle from the rectangle, start the SUBTRACT command. At the Select solids, surfaces, and regions to subtract from .. Select objects: prompt, select the outer object, in this example, the rectangle. End selection.
- At the Select solids, surfaces, and regions to subtract .. Select objects: prompt, select the inner objects, in this case, the circle. End selection.
AutoCAD creates one object, which is a rectangular 2D region with a hole in it.
A region with a hole in it

Ellen Finkelstein is the author of the best-selling AutoCAD & AutoCAD LT Bible, which started with R14. Ellen has written extensively on AutoCAD, including articles for Autodesk’s website and features for AutoCAD’s Help system. Ellen’s first book was AutoCAD For Dummies Quick Reference.
Latest posts by Ellen Finkelstein (see all)
- Combine or subtract 2D shapes to create custom shapes - February 17, 2022
- Working with linetype scales - January 18, 2022
- Rename named objects–blocks, dimension styles, layers, and more - December 21, 2021


I’ve sometimes used regions with subracted areas as a means for creating viewports with uniquely masked areas for subset details. In the paperspace layout, once you have the region defined with subracted area, as in your example, you just use the MVIEW command with the “Object” sub-option.
I use your way of creating regions and subtracting the inside object for the purpose stated by Mr. Mike Pool
I liked the way you have explained about creation of a region and subtracting from it another region to create a hole. I think I am going to use your explanation for region creation etc. for preparing a lesson for my AutoCAD students.
Thanks.
thanks a lot