
Since AutoCAD 2008, you can refine table styles with cell styles, which define formatting for table cells. A cell style is part of a table style, but has its own name. Follow these steps to create a cell style.
- Choose Draw> Table or choose Home tab> Annotate panel> Table to open the Insert Table dialog box.
- In the Table Style section, click the
 Launch the Table Style Dialog button.
 - In the Table Style dialog box, click New. Then enter a name and a style to start with. Click Continue. The New Table Style dialog box opens.
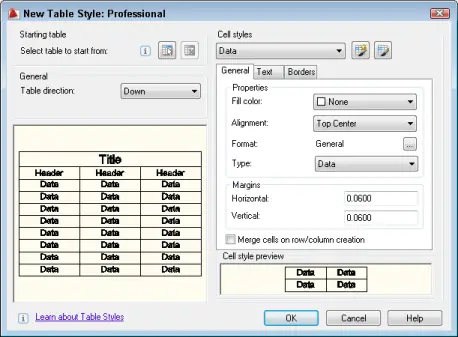
Note: You format the cells using the Cell Styles section on the right side of the dialog box. You use three tabs, General, Text, and Borders. These settings apply to three types of cell styles: Data, Header, and Title, which you choose from the drop-down list at the top of the section. The cell style applies to only one type of cell style, meaning that you would most often have at least three cell styles for a table — one for the title, one for the column headers, and one for the data.
- To save a new cell style, click the
 Create a New Cell Style button. If you omit this step, you format the table’s cells, but don’t save a named style that you can use in the future. In the Create New Cell Style dialog box, enter a name. You can choose a cell style to start with or leave the default. Click Continue. The new cell style name now appears on the drop-down list.
 - On the General tab, choose a Fill color from the drop-down list.
- Choose an alignment from the Alignment drop-down list. This refers to text alignment, but is on the General tab, not the Text tab.
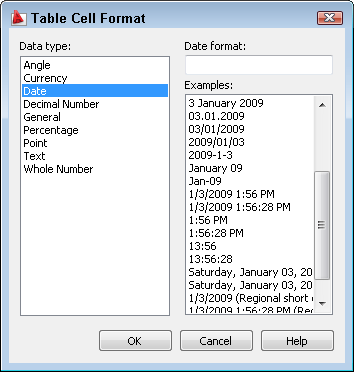
- To change the format, click the Ellipsis button to open the Table Cell Format dialog box. The settings here are somewhat similar to those you have when you format cells in Microsoft Excel. You can format angles, currency, dates, decimal numbers, percentages, points, text, and whole numbers. Except for the General and Whole Number types, you can choose from various formats.
- From the Type drop-down list, choose Data or Label. The purpose of the Label type is to function as a table header or column title. If you break a table into sections, you can repeat label cells in each section. For a data cell, use the Data option.
- In the Margins section, specify horizontal and vertical margins. The margin is the space between the text and the cell border.
- On the Text tab, choose a Text style from the Text Style drop-down list, or click the Ellipsis button to open the Text Style dialog box and define a text style from scratch.
- Enter a value in the Text Height box.
- From the Text Color drop-down list, choose a color. The default is ByBlock.
- Enter a value in the Text Angle box. The default is 0, of course.
- On the Borders tab, choose an option from the Lineweight drop-down list.
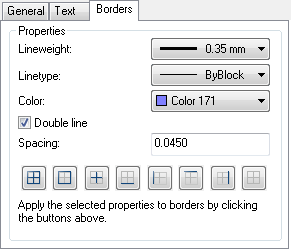
- Choose an option from the Linetype drop-down list.
- Choose a color from the Color drop0dnw list.
- If desired, check the Double Line check box to create a double border.
- From the Border buttons, choose an option. These options define whether the cells have inside borders, outside borders, or both.
Note: If you use only outside borders, you’ll still see grid lines between the cells in your drawing, but they won’t plot.
- Repeat the process from Step 4 to create a cell style for your headers and then again for the table’s title. If you need various types of data formatting, such as dates, numbers, and text, create a cell style for each type.
- When you’re done creating cell styles, click OK.
- In the Table Style dialog box, your new talbe style should be selected. If not, select it and click Set Current. Click Close. In the Insert Table dialog box, your table style should appear in the Table Style drop-down list.
- In the Set Cell Styles section of the Insert Table dialog box, choose the cell styles that you want for the first row (usually a title style), second row (usually a header style), and all other rows (usually a data style).
- Click OK and specify an insertion point for the table. The table appears. Enter the data; it automatically takes on the appropriate styles.
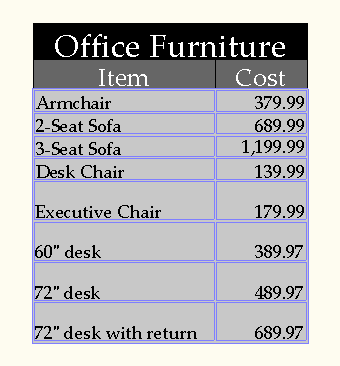
- If you have more than one data style, select some data cells by dragging across them, right-click, and choose Cell Style, then the specific style that you want. Here, the left data column uses a text style and the right column uses a currency style.

- Combine or subtract 2D shapes to create custom shapes - February 17, 2022
- Working with linetype scales - January 18, 2022
- Rename named objects–blocks, dimension styles, layers, and more - December 21, 2021
 Instagram
 LinkedIn
 Facebook

thanks for your assistance
How about a Table Style for the Sheet List Table that generates from the Sheet set manager?
[…] AutoCAD Tutorial: Create a Cell Style For a Table […]