The faster you can display the section of your drawing where you need to work, the faster you can get started drawing and editing. With that in mind, here are some tips for viewing your drawing:
Use the mouse wheel
The mouse wheel is the key to fast view changes:
- You can zoom in and out by rolling your mouse wheel. Roll away from you to zoom in, towards you to zoom out. Did you know that where you place the cursor determines the center of the zoom? You don’t have to click. Just move the cursor to the area of your drawing that you want to zoom in to, and zoom in with the mouse wheel.
- You can do a Zoom Extents by double-clicking the mouse wheel.
- You can pan by dragging (pressing and holding) with the mouse wheel. Tip: You can pan past the application window and even the edge of your screen. Just keep dragging the mouse cursor.
- In 3D drawings, press Shift + the mouse wheel and drag to do a transparent 3D orbit.
Save a view
Saving views is especially helpful in large drawings. Set up the view that you want and then use the VIEW command to open the View Manager. Click New and enter a name. Click OK to accept the default of using the current view. Or choose Define Window to return to your drawing to define a view boundary. You can pan and zoom at the same time. Press Enter to return to the View Manager. Click OK to complete the process.
To display a saved view, again use the VIEW command. Choose the view from the list, click Set Current, and click OK.
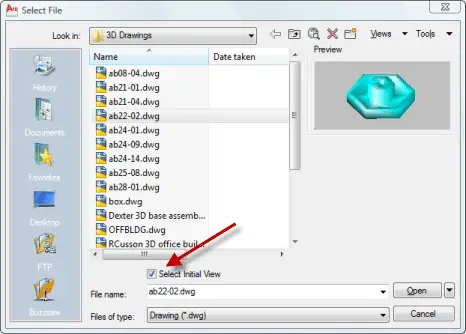
You can open a drawing to a saved view. In the Select File dialog box, check the Select Initial View check box and click Open. The Select Initial View dialog box opens, where you can choose the view that you want to display when you open the drawing. Click OK.

Specifying an initial saved view when you open a drawing
Use the ViewCube

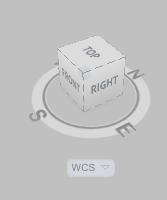
The ViewCube in AutoCAD 2010
For 3D drawings, the new ViewCube is a handy way to change viewpoints. You just click on the face, edge or corner of the cube. You can also drag the ViewCube to make minor changes in your viewport; it’s not that different from 3D Orbit.
Has anyone found the Steering Wheel in 2010 useful?
Automate 3D views
In a comment on the post, Productivity Boost Ideas, someone asked about AutoLISP code for SE Isometric and other viewpoints. You can use the VPOINT command to automate these views. Here are the settings for the VPOINT command:
- Top: VPOINT 0,0,1
- Bottom: VPOINT 0,0,-1
- Left: VPOINT -1,0,0
- Right: VPOINT 1,0,0
- Front: VPOINT 0,-1,0
- Back: VPOINT 0,1,0
- Southwest: VPOINT -1,-1,1
- Southeast: VPOINT 1,-1,1
- Northwest: VPOINT -1,1,1
- Northeast: VPOINT 1,1,1
Leave a comment with other tips you have for viewing a drawing!
- Combine or subtract 2D shapes to create custom shapes - February 17, 2022
- Working with linetype scales - January 18, 2022
- Rename named objects–blocks, dimension styles, layers, and more - December 21, 2021

 Instagram
 LinkedIn
 Facebook
I knew I’d get the best deal when I bought your book,Ellen
Thanks for the tip!
Ellen,
What are the steps to get the QS drawings? one in particular:
QS-Drawing_a_window.avi
Thanks, John
John,
That’s available on the companion website for AutoCAD Bible. The URL is in the book.
Ellen
I have rotated the view in model space in order to line up my drawing horizontally (to anotate + dimension). However, in paper space the viewport view keeps showing the object at the original angle of 20 degrees off horizontal. How can I rotate the paper space VIEW to show the object the same way as in model space – lined up horizontally?
Thank you
Tony
Ellen
Thanks for the tips, I am sharing with my friends too.
Thank you
Kashif
Hi Ellen i have problem to see my file on select file command,which is when u click the particular file name its wont appear on the preview screen.