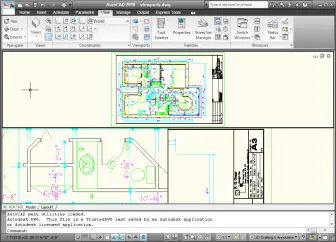
Tiled viewports let you divide up the drawing area into tiles and display different parts of your drawing in each. The great thing about tiled viewports is that you can draw from one viewport to another without missing a beat, making them great for large drawings where you need to alternate between working in detail in a small area and working in a larger area. In fact, it’s common to use one viewport for a view of the entire viewport, and others for zoomed in details.
You can set up a wide variety of configurations of tiled viewports, and set the view however you want in each one, using standard zooming and panning. But no matter how you set them up, they always take up the entire drawing area, unlike floating viewports.
Note: Floating viewports are for laying out a drawing in paper space for plotting. Tiled viewports are for drawing and editing.
Only one tiled viewport can be active at a time. The crosshairs appears only in the active viewport. Just click inside a viewport to make it active. Then you can draw or edit there, in the same way you usually do in model space, when you only have one viewport, which is the default.

Create tiled viewports
To choose from preset tiled viewport configurations, choose View> Viewports> New Viewports. In AutoCAD 2009 and 2010, go to View tab> Viewports panel> New. This opens the Viewports dialog box.
Choose one of the options to see its preview. Note that at the bottom, you can make the following adjustments:
* Apply to: You can use the default Display option to apply the configuration to the entire drawing area. Alternatively, you can choose Current Viewport from the drop-down list to divide up an existing viewport. In this way, you can create customized configurations.
* Setup: You can choose 2D or 3D. If you choose 3D, AutoCAD creates standard orthogonal views of your model for you.
* Change view to: You can choose named views that you’ve saved from this drop-down list.
* Visual Style: For 3D drawings, you can choose a visual style.
Use tiled viewports
Once you have your viewports, click inside each one and zoom and pan until you have the view that you want. You work inside a viewport in the same way you would without them. Think of the usual way you work as a single tiled viewport.
Let’s say that you need to draw a line from the far left of your drawing to the far right. With the configuration shown above, you can zoom in to the left side of your drawing in the lower-left viewport, and zoom in to the right side of your drawing in the lower-right viewport. Then follow these steps:
1. Click in the lower-left viewport and start the LINE command.
2. Specify the start point as needed.
3. At the Specify next point or [Undo]: prompt, click the top viewport and move the cursor to the approximate location of the endpoint at the right side of your drawing.
4. Click the lower-right viewport. Now you see the endpoint of the line. Specify the endpoint and press Enter to end the LINE command.
You can use a similar technique for editing as well.
Save and restore viewport configurations
If you have a custom configuration that you like, you can save it. Choose View> Viewports> New (View tab> Viewports panel> New in 2009/2010), which opens the Viewports dialog box with the Named Viewports tab on top. The current configuration is highlighted, named Active Model Configuration. Enter a name in the New Name text box. The name can be up to 255 characters and can include spaces. Click OK.
Tp restore a saved configuration, choose View> Viewports> Named Viewports (View tab> Viewports panel> Named (Viewports) in 2009/2010). This opens the same Viewports dialog box, but with the Named Viewports tab on top. Choose the configuration you saved, and click OK.
Tip: Did you know that you can used saved tiled viewport configurations to make configurations of floating viewports? You use the same Viewports dialog box to create floating viewports on a layout and you’ll find your saved viewport configurations on the Named Viewports tab, ready to use in paper space.
Remove tiled viewports
You can remove tiled viewports in two ways:
* Join two viewports: Choose View> Viewports> Join (View tab> Viewports panel> Join (Viewports) in 2009 and 2010). At the Select dominant viewport : prompt, click inside the viewport you want to keep (or press Enter to keep the active viewport). Then, at the Select viewport to join: prompt, click inside an adjacent viewport. The resulting view is the same as the dominant viewport.
* Return to one viewport: Choose View> Viewports> 1 Viewport. (In 2009 and 2010, View tab> Viewports panel> Select a Viewport Configuration/Viewport Configuations drop-down list> Single.)
Related tips:
* Display a named view in a viewport
* Zoom to objects
- Combine or subtract 2D shapes to create custom shapes - February 17, 2022
- Working with linetype scales - January 18, 2022
- Rename named objects–blocks, dimension styles, layers, and more - December 21, 2021

 Instagram
 LinkedIn
 Facebook

Can you Draw order view ports
I would like to create my view ports in the model, to facilitage labeling callouts, and to eliminate confusion as to what views are located where. Then, I can create a new tab for each viewport, with titleblock on paperspace, and enclose the selected model viewport in the paperspace viewport. That way I can navigate and organize all my pages and callouts from the model.
Is this possible?
How would I go about it? The viewports seem to be limited to 4 in model space.
Do you think it’s a practicle idea?