(For Releases 2004 and 2005)
If you have custom menus that you have been using for inserting blocks, you know that creating and maintaining these menus is a major project.
If you have a digitizing tablet, you may be using the Tablet 1 section of the tablet menu. If you change a block, you need to edit the menu, create a new image, edit tablet.dwg, and finally replot tablet.dwg to place the new version on your digitizing tablet.
Or you may have created a slide library with slides of your blocks and your customized commands. You may have put the slide library images in an image-tile menu that you display from a pull-down menu item that you have created. Making changes involves editing the menu, recreating the slide, editing the slide list, and recompiling the slide library from the command line.
In both scenarios, you needed to reload the new menu.
A simpler method is to use tool palettes. A reader, Ronald E. Walker, asked me several questions about the new tool palettes and together we worked out the following procedure. He has used slide libraries in the past and is converting them to tool palettes. First I explain the steps for AutoCAD 2005. Afterwards, I explain what you need to do in 2004.
Steps for 2005
- In the drawing containing the block, type PNGOUT. (This command creates a PNG file, one of the file types that the tool palettes uses to create the icons. It creates small, accurate files.)
- In the Create Raster File dialog box, name the file and choose a location in your support file search path. Click Save.
- At the Select objects: prompt, select the block.
- Right click in an open area of a tool palette and choose New Tool Palette to create a new tab.
- Right-click an open area of the new tab and choose Customize. In the Customize dialog box, click the Commands tab.
- Click and drag any command from the Commands area on the right side of the dialog box to the Tool Palette. (The exact command is not important, because you will edit it.)
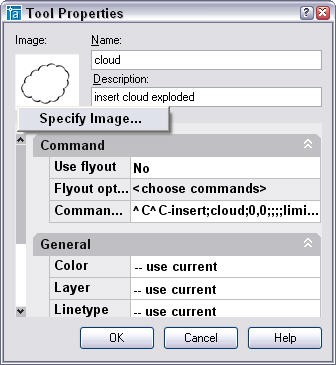
- In the Tool Palette, right click the command tool and choose Properties. The Tool Properties dialog box opens, shown here.

- In the Command String item, enter your command string. You can copy and paste from your menu.
- Change the name and description in the appropriate text boxes.
- Right click the image in the upper left corner of the dialog box, as shown here, and choose Specify Image. (You may just see a square.)
- Navigate to the PNG file you saved earlier and click OK.
- Click OK to close the Customize dialog box.
Note, if you don’t see the image clearly, you may need to crop it in an image editor.
Editing the tool palette is easy. Just edit the Command String to change the macro. However, if you change the block, you need to update the image. This process is not automatic. The easiest method is to right-click the tool, choose Properties, and right-click the image. Choose Select Image, choose a different image, and click OK. Then repeat the process with the correct image to update the image.
Steps for 2004
In 2004, you need to work directly with the .atc files that create the tools. To find their location, choose Tools>Options and click the Files tab, and double-click Tool Palettes File Locations. In that folder you’ll find a Palettes folder containing the .atc files plus an Images folder that contains the images used by the icons.
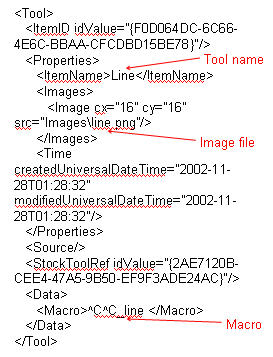
The .atc file is a text file that you can modify. It has many codes that I certainly can’t figure out, but for a command tool palette, the important parts are the tool name, image file, and the macro that executes the command. Here is an example of a command tool palette that simply executes the line command.
You can download this .atc file.

Note that the image is in PNG format. To create the PNG file, see the steps above for Release 2005.
To create the tool palette, follow these steps:
- Edit the .atc file to change the tool name, the image name, and the command macro itself to suit your needs.
- Create a new tool palette. (Right-click and choose New Tool Palette. Name the palette and press Enter.)
- Open Windows Explorer and find your .atc file.
- Drag the .atc file to the palette. (You probably need to adjust your Windows Explorer window so you can see both the file and the palette.)
- Combine or subtract 2D shapes to create custom shapes - February 17, 2022
- Working with linetype scales - January 18, 2022
- Rename named objects–blocks, dimension styles, layers, and more - December 21, 2021

 Instagram
 LinkedIn
 Facebook
Leave a Reply