You can create dynamic blocks that you can easily flip after you insert them. This is great for doors which may open from the left or right, or open inward or outward. Dynamic blocks were introduced in AutoCAD 2006.
Follow these steps to create a door that flips both ways:
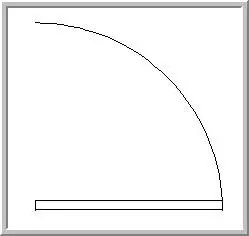
Start with a door block, like this one. You might want to insert it into a new drawing. You don’t need to explode it; when you open it in the Block Editor, you’ll have access to all the individual components, as if you had exploded it. That’s one of the great features of dynamic blocks; you can work with complex blocks that contain many components and individually program each component.
![]() Choose Block Editor from the Standard toolbar (the BEDIT command). Here’s what you see.
Choose Block Editor from the Standard toolbar (the BEDIT command). Here’s what you see.
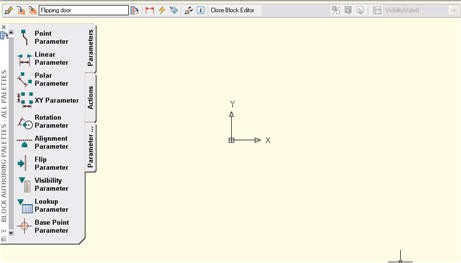
Note that the Block Editor has its own toolbar. It also has its own UCS icon. This is very important, because 0,0 in the Block Editor will be the insertion point of the block. When you open the block in the Block Editor, its insertion point will be at 0,0 in the Block Editor, like this:
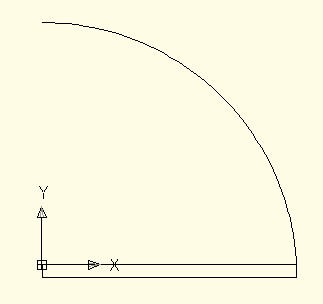
The first flip action we’ll create will be like mirroring with a vertical mirror line; it will flip the door to the left or right. Unflipped, the door will be as you see it here, which means it opens from the right to the left. Flipped, the door will open from the left to the right.
Click the Parameters tab of the Block Authoriing Palettes window and choose Flip Parameter. At the Specify base point of reflection line or [Name/Label/Description/Palette]: prompt, choose the Label option. This option lets you customize the label. It’s important to change it, because we’ll have two flip parameters when we’re done. Enter Flip Left/Right.
You can also customize the names for both states (which appear in the Properties palette). so the next thing you see is this prompt:
Specify values for items in the flip property dropdown control:
Enter flip property value for an unflipped state <Not flipped>:
Enter flip property value for a flipped state <Flipped>:
You can leave the defaults (Not flipped and Flipped), but instead, enter Opens at right for the unflipped state and enter Opens at left for the flipped state. Later, when you select the block, you can see which state you have in the Properties palette.
You can change these values at any time by selecting the parameter and using the Properties palette.
Now the original prompt returns. Specify base point of reflection line or [Name/Label/Description/Palette]: Specify the midpoint of the bottom horizontal line of the door.
Specify endpoint of reflection line: Specify any point 90° above the midpoint, to make a vertical flipping line.
Specify label location: Place the label above the door.
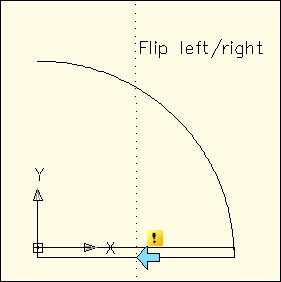
Notice the exclamation point. That tells you that you haven’t completed the process of flipping the door. That’s because most parameters also require a corresponding action.
Click the Actions tab of the Block Authoring Palettes window and choose Flip Action. A Flip action always goes with a Flip parameter.
At the Select parameter: prompt, select the parameter you just added.
At the Select objects: prompt, select all the objects of the door. In this situation, you can include the parameter, too.
At the Specify action location: prompt, place the action, usually near the parameter label. It doesn’t show in your drawing, so it’s just for your convenience when editing the block in the Block Editor.
You can change the action’s name. Select it and change the Action Name value in the Property palette to Flip left/right action. I find it helpful to distinguish the parameter label from the action name. Our door now looks like this in the Block Editor.
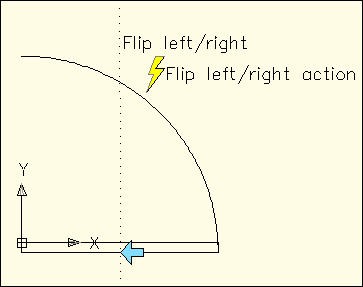
Click ![]() Save Block Definition on the Editor’s toolbar (the 2nd button from the left). To try it out, click Close Block Editor. If you already have inserted an instance of the block in the drawing, you get a message about it. Click Yes.
Save Block Definition on the Editor’s toolbar (the 2nd button from the left). To try it out, click Close Block Editor. If you already have inserted an instance of the block in the drawing, you get a message about it. Click Yes.
To test the block, choose Insert Block from the Draw toolbar and choose the block. In the Insert dialog box, you should see that yellow lightning icon in the preview box, to show that it’s a dynamic block. Make sure that only the Insertion Point Specify On-Screen check box is checked and click OK.
Specify the insertion point in your drawing to insert the block. To flip it, select it and you’ll see the turquoise flip grip on the block. Click the grip to flip the door. Click it again to flip it back.
When you’re satisfied, open the Block Editor again, choose the block and click OK. Now you need to add the flip for the other direction.
Again, click the Parameters tab and choose Flip Parameter. At the Specify base point of reflection line or [Name/Label/Description/Palette]: prompt, pick the midpoint of the right side of the door — the short side. You may have to zoom in to do this.
At the Specify endpoint of reflection line: prompt, move the cursor to the left and pick any point 180° from the first point (creating a horizontal mirror line).
At the Specify label location: prompt, pick a point to the right of the door, or perhaps just beneath it.
Tip: When you zoom in and out, sometimes the size of the labels gets out of synch. Click the ![]() Update Parameter and Action Text Size button on the Editor’s toolbar.
Update Parameter and Action Text Size button on the Editor’s toolbar.
Select the parameter. In the Properties palette, change the label to Flip in/out.
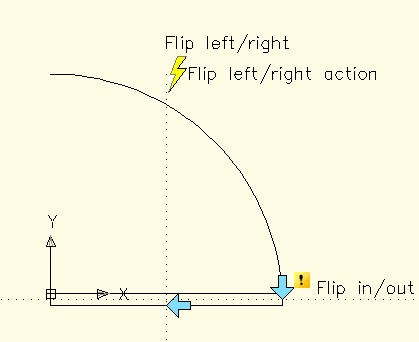
Click the Actions tab and choose Flip Action. At the prompt, select the parameter you just created.
At the prompt to select objects, select the door. Not only can you select this action’s parameter, but you can select everything else (which makes it easy).
If you want, change the name of the action in the Properties palette. I changed it to Flip in/out action. Here’s the final dynamic block in the Block Editor.
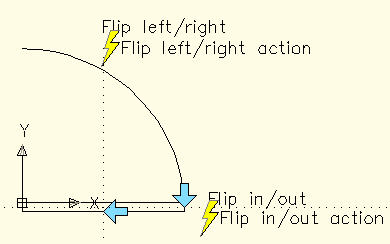
Click Save Block Definition and click Close Block Editor. If you get the notice about an existing block reference existing in the drawing, click Yes.
Here you can see the block at work. It flips both ways!
- Combine or subtract 2D shapes to create custom shapes - February 17, 2022
- Working with linetype scales - January 18, 2022
- Rename named objects–blocks, dimension styles, layers, and more - December 21, 2021

 Instagram
 LinkedIn
 Facebook
I have 2 different drawing files. I insert the same dynamic block in each. In one drawing the text flips, in the other it is in mirror format. Why? Mirrtext is 0 in both.
This is great and all but your flip remains fixed to your Horizontal and Vertical lines at 90 degree angles, so if you have a angled wall your door will not flip according to the wall angle but your Vertical/Horizontal reference lines, and therefore, is useless. Unless you can show us how to rotate about a fixed point? So that it remains in the same plane as the walls, whatever orientation.
If I use a polar stretch in a dynamic block and I use the flip command, it flips the grips over both axes (x and Y), how can I avoid it, I only want to flip over the Y axes and not the X axes?
I’m having a difficult time getting this to work because my palettes don’t say
Parameters or actions and for days I have been struggling with this thing