In AutoCAD, you can create custom shapes using code that resides in a text file. You can insert a shape using the SHAPE command. Custom fonts (especially non-Roman ones) are often created using this shape feature.
Shapes vs blocks
Inserting a shape is similar to inserting a block, so let’s start with the difference between shapes and blocks:
- Shapes are much harder to create, but I’m going to give you a great shortcut!
- Shapes are compiled into a format that conserves space, memory, and regeneration time
- You can simply insert them into a drawing, use them to create fonts, or add them to linetypes
- Shape files are support files. If you distribute a drawing, then be sure to include any font or shape files that the drawing uses
You wouldn’t use a shape for just one drawing. Instead, use shapes when you want to store them for use many times, especially many times in one drawing. That’s where their small size can make a difference.
What’s the shortcut?
Coding a shape is complex, but there’s a shortcut! It’s the MKSHAPE command, part of Express Tools. Here are the steps:
- Draw any object or set of objects that you want to turn into a shape.
- Go to Express Tools tab> Tools (expanded — click the down arrow)> Make Shape or simply type mkshape.
- The MKSHAPE – Select Shape File dialog box opens. Navigate to the location where you want your shape file to be. It should be in AutoCAD’s support file search path.
- In the File Name text box type a name for your shape file and click Save. (You can put more than one shape in a file, so instead of typing a new file name, you can select an existing shape file.)
- At the Enter name of the shape: prompt, type a name for the shape. I recommend making the shape and shape file the same unless you want more than one shape in a file.
- At the Enter resolution: prompt, press Enter to keep the default value or enter a new value. A higher resolution will give a more accurate representation but the size of the shape definition will be larger. Resolutions have to be divisible by 8 (the program will round off for you) and the largest value is 32,767. You can experiment with varying resolutions to find one that works for you. I would suggest a minimum of 240.
- At the Specify insertion base point: prompt, specify the insertion point. Use an object snap if possible.
- At the Select objects: prompt, select that objects for the shape and press Enter to end the selection process.
You see the following text on the command line:
- Determining geometry extents…Done.
- Building coord lists…Done.
- Formating coords…|Done.
- Writing new shape…Done.
- Compiling shape/font description file
- Compilation successful. Output file C:\AutoCAD Bible\wave1.shx contains 137 bytes.
- Shape “WAVE1” created.
- Use the SHAPE command to place shapes in your drawing.
Nothing else visible happens, but the MKSHAPE command creates a SHX file, which is the compiled format of the shape.
How to insert a shape
You use the SHAPE command to insert a shape that you have defined. You insert SHX files. Here are the steps:
- At the Enter shape name or [?]: prompt, enter the shape name or choose the ? option, then press Enter to list the available shapes. If the shape you want isn’t available, you’ll need to load it using the LOAD command, which I explain next.
- At the Specify insertion point: prompt, pick the point where you want the shape to go.
- At the Specify height <1.0000>: prompt, specify a height. It’s really a scale factor. Press Enter to accept the default.
- At the Specify rotation angle <0>: prompt, specify a rotation angle or press Enter to accept the default.
Shapes need to be loaded with the LOAD command. Type load and navigate to the SHX file that you want. Click Open.
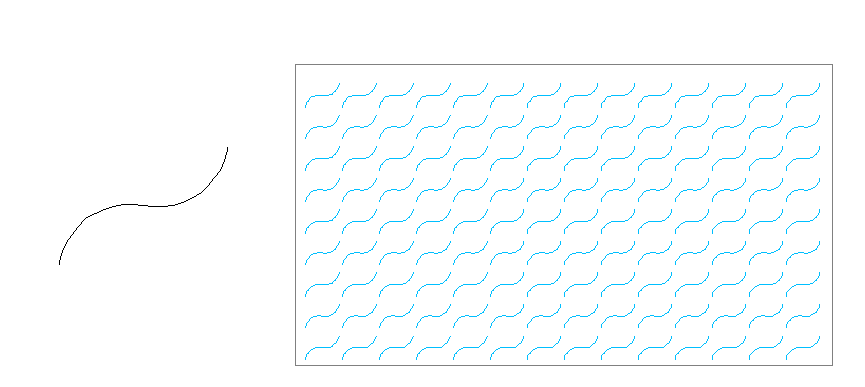
Here you see a shape that I made from 2 arcs. Then, I inserted the shape at a height of .15 and arrayed it to fill the pool with water!

Once you create a shape, you can include it in a complex linetype using MKTYPE, another Express Tools command.
- Combine or subtract 2D shapes to create custom shapes - February 17, 2022
- Working with linetype scales - January 18, 2022
- Rename named objects–blocks, dimension styles, layers, and more - December 21, 2021

 Instagram
 LinkedIn
 Facebook
Thanks Ellen, is very useful tips that you public and I Thanked for your help, Robert
thanks for this tip.I was looking for a tip that could save space and memory, my drawing are always to big
[…] View the original article here window._wp_rp_static_base_url = "http://dtmvdvtzf8rz0.cloudfront.net/static/"; […]