We often encounter objects and details that might be too complex to draw in 3D. From columns and balusters to spigots, escutcheons, machine parts etc.
But as like most things, complex objects also have humble beginnings.
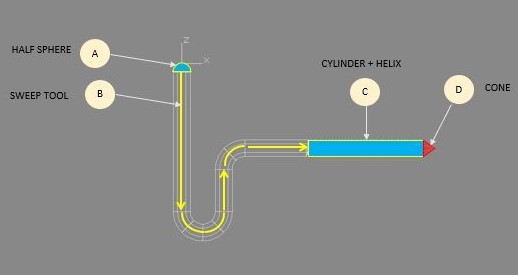
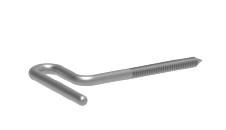
For this example, we can see that the object resembles a hook (see final image above), which we can segregate to several components, (A) spherical head, (B) cylindrical curved body, (C) threaded part, and (D) pointed end. From these parts, we can infer that it is composed of a half-sphere, a circle extruded in a direction, a spiraled rectangle, and a triangle.

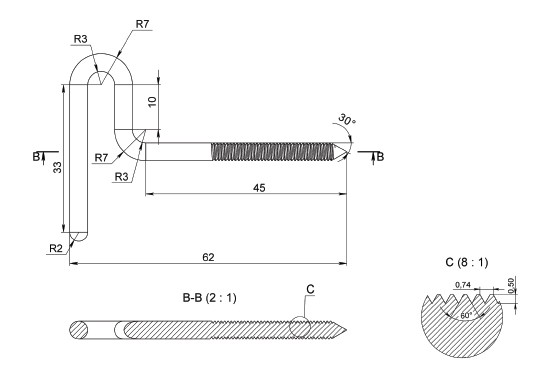
After identifying these basic geometries, we can now start creating the 3d model based on this perimeter/dimension:
1. Open a new drawing. Make sure you are working with GRIDMODE (F7) and ORTHOMODE (F8) on.
2. First, we identify major dimensions for the solid (midpoint and boundaries), set the center point to 0,0.
Switch to 3d Modelling Mode
3. Component A. From the center point, Use the command SPHERE, from the center point create a sphere. Enter the diameter or snap to reference lines. From the boundary lines, create a box. Extrude towards the apex of the sphere, snap. Type or click INTERSECT. You are now left with half of the sphere
4. Component B. From the base of the half-sphere, create a CIRCLE from the center point. Switch to side view and identify major dimensions in elevation (critical areas where parts of the solid merges, bends, or intersects). Using POLYLINE, draw the outline perpendicularly starting from the center. Using the SWEEP command, click the circle and follow the outline. Click or press ENTER.
5. Component C. To achieve the threaded part, we will circumscribe a CYLINDER (CYN) from the end part of Component B. Create a circle smaller than the previous component (Radius- Thread depth), use this as the diameter of your new cylinder, indicate the length then press Enter.
After making a cylinder, we create a winded thread around the smaller cylinder. Using the HELIX command, indicate the base and number of turns based on the segments of the thread (Length-Thread Distance). Stretch towards the length of the model. Press Enter.
6. Component D. To create the conical point switch to the UCS as before, then click or type CONE. Indicate the cone base and height as prompted. Press Enter.
Finally, to weld together all the parts of the model together, select UNION. Select the different parts and then Enter. You now have a completed AutoCad 3D model of a hook.
For more drawings that you can use to practice your skills, be sure to check out our previous AutoCad 3D modelling step by step tutorial to draw a 3D piston and this e-book with 101 CAD Exercises – Learn & Improve Your Skills.
Any questions about this tutorial? Do you have any tips to help make this tutorial easier? Did you find this tutorial helpful? Leave a comment! And please share the knowledge using the Share buttons below!
- Top Six solutions to common XREF problems - August 25, 2020
- 3D Model in AutoCad – Simplify complex objects with compound volume - July 26, 2020
- Lockdown and print-up: How to use your CAD skills in the battle against coronavirus - May 13, 2020


 Instagram
 LinkedIn
 Facebook
Leave a Reply