AutoCAD 2015 and AutoCAD LT 2015 Bible
The most comprehensive AutoCAD book around!   |
3D Tutorial: Draw a glass By Ellen Finkelstein
This tutorial will create a drinking glass. I used the measurements of one that I had in my kitchen. I recommend using the 3D Drafting workspace
- Draw a circle with a radius of 1.25.
- On the View tab, click the Views drop-down and choose SE Isometric.
- Start the EXTRUDE command. Select the circle and end selection.
- Choose the Taper Angle option.
- Enter -5 for the taper angle. You use a negative number to taper outward.
- Enter 5.5 for the height of the extrusion
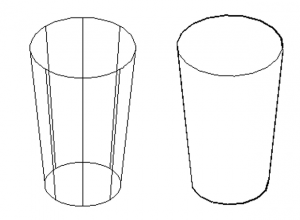
The results looks like a glass, as you see on the left. (I’ve changed the ISOLINES system variable to 8 to give it a nicer look.) But when you use the HIDE command on it, as you see on the right, you see that it’s a solid.
To create a glass, you use the Shell feature, which is part of the SOLIDEDIT command.
- On the Solid tab, in the Solid Editing panel, click the Shell button.
- Select your solid.
- At the Remove faces or [Undo/Add/ALL]: prompt, you need to remove the face that you don’t want to shell. For a glass, it’s the top face, because you want that face to remain open. In a view like the one above, you just click inside the top face of the solid.
- The prompt repeats; just press Enter.
- Enter 3/32 for the shell offset distance.
- Press Enter twice to exit the command. (If you find that you removed the wrong face, use the Shell option of the SOLIDEDIT command and try again.
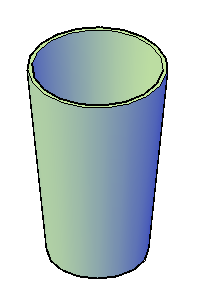
Here’s the result, with some shading.
Now, all you need is some water!
Ellen Finkelstein is the author of the best-selling AutoCAD & AutoCAD LT Bible, which started with R14. Ellen has written extensively on AutoCAD, including articles for Autodesk’s website and features for AutoCAD’s Help system. Ellen’s first book was AutoCAD For Dummies Quick Reference. Latest posts by Ellen Finkelstein (see all)
|
This Month's Top 10 Most Popular Cad Tips
Draw faster and easier!Top 25 Productivity Tips Every AutoCAD® User Should Know

|


 Instagram
 LinkedIn
 Facebook
great thanks alot
Excellent for a beginner like me…Thanks
one of the very good tips for all begginner.
thanks………….
Actually I want auto cad tutorial manual
I’m getting an error at the shelling part. Here’s my output:
=============================================================
Command: _solidedit
Solids editing automatic checking: SOLIDCHECK=1
Enter a solids editing option [Face/Edge/Body/Undo/eXit] : _body
Enter a body editing option
[Imprint/seParate solids/Shell/cLean/Check/Undo/eXit] : _shell
Select a 3D solid:
Remove faces or [Undo/Add/ALL]: 1 face found, 1 removed.
Remove faces or [Undo/Add/ALL]:
Enter the shell offset distance: 3/32
Modeling Operation Error:
Change in topology detected.
==========================================================
This happens every time. Any suggestions?
I haven’t seen that, but do try clicking in a different place to select the face. It’s sometimes finicky.
i search this because im taking architaectural cad operating now heheh tnx
Dear madam, I am willing to learn how to draw 3d flanges , valves and gaskets , bolt and nuts please send these drawing steps. Please. Send to my mail ezhil2787@gmail.com
thanks
great! thank you
Big up for sharing I had a good time reading this. cheers – sarah
Very useful guidelines. The step by step explanation makes it easy understand. Thanks for sharing this tutorial.